|
Interface |
Grouped on the Interface page are the general look and feel options that apply to the program, its main window and built-in utilities.
Style
Define how tests are displayed in the Test Detail Area:
Report - table view, one test per line as a small icon followed by detailed test information
List - top-down view, a small icon with a test name;
Icon - tests arranged left to right, a large icon with a test name;
Small icon - tests arranged left to right, a small icon with a test name;
Color scheme
Chose a color scheme to be used for the main window, log viewer and utilities. Select one of the pre-defined or create a new scheme by pressing the button to the right of the Scheme Name box.
See Color profiles for more information on colors.
Show grid lines
If the option is enabled, HostMonitor will display gridlines to separate task items in the main window.
Show tests in subfolders (recursive)
If the option is disabled, displayed in the Test Detail Area will be tests contained directly in the currently selected folder. If the option is enabled, all tests contained in the current folder and in all of its descending subfolders will appear in the Test Detail Area.
|
|
Columns |
Use the Columns page to select columns (test parameters) to display in the Test Detail Area.
To select/deselect a column, toggle the check mark next to it. To change a column's display order, highlight the column and
then use the Up  and Down and Down  arrow buttons to the right of the list of columns to display.
The Sort by list defines the order in which tests will be arranged. To add a column to the sort order, highlight a
column in the left-hand list and then click the Right  arrow button.
The column will show up in the Sort by list. To remove a column from the search order, select a column in the Sort by list and then click the Left arrow button.
The column will show up in the Sort by list. To remove a column from the search order, select a column in the Sort by list and then click the Left  arrow button. arrow button.
To change the display name of a column, highlight the column and click the little button  to the right of the list box. to the right of the list box.
Here is a list of test parameters supported by HostMonitor with a brief description of each parameter.
| Column name | Field description |
| Test name | The name of the test |
| Status | The current status of the test |
| Recurrences | The number of consecutive tests resulting in the same status as the current one |
| Reply | The value last returned by the test (the meaning of the Reply parameter is test specific) |
| Last test time | The time when the test was last performed |
| Last status | The status of the previous test |
| Last reply | The value returned by the previous test (test-specific) |
| Interval | The time between two consecutive runs defined for the test |
| Test method | The type of the test |
| Comment | Any arbitrary comments |
| Related URL | Test-related URL |
| Master test | The name of the Master test (for more information on test dependencies see Common test properties) |
| Schedule | The name of the associated schedule |
| Alert profile | Alert profile name |
| Private log | The specified private log file name |
| Created at | The time when the test was created |
| Modified at | The time when the test was last modified |
In addition to the static test parameters (test name, interval, status, etc.), and current status related
(status, reply, etc.) a number of dynamic statistics data fields are maintained and can be viewed (and reset) in real time.
| Column name | Field description |
| Alive % | "Good" to overall tests ratio, in percent |
| Dead % | "Bad" to overall tests ratio, in percent |
| Unknown % | "Unknown" to overall tests ratio, in percent |
| Total time | The time the test has been in monitoring |
| Alive time | The overall time the test has had a "Good" status |
| Dead time | The overall time the test has had a "Bad" status |
| Unknown time | The overall time the test has had an "Unknown" status |
| Total tests | Overall tests performed |
| Passed tests | The number of "Good" tests |
| Failed tests | The number of "Bad" tests |
| Unknown result tests | The number of "Unknown" tests |
| Average reply | The average value of the results obtained |
| Min reply | The minimum value of the results obtained |
| Max reply | The maximum value of the results obtained |
| Status changed at | The time when the status last changed |
| Status changes count | The number of times the status has changed |
|
|
Preferences |
On this page define the following options:
Windows Font
Choose the font/size for the main window, log viewer and the utilities.
Terminal window font
Choose the font/size for the Telnet utility.
Icon in system Tray
Hide to tray HostMonitor when it is minimized.
Animate tray icon when working
The program can animate the tray icon when it is in working mode.
Change icon when a host dies
HostMonitor will change icon from blue to red when any host changes status to "bad", or change color to yellow if a test goes to "Unknown" status.
HostMonitor always Top
HostMonitor will remain in front of all other windows (unless minimized).
Auto save TestList after any changes
If the option is enabled HostMonitor will automatically save all changes (add, edit, remove host, etc) in the current TestList file.
If the option is disabled, saving changes is up to the user (use the "Save" and "Save as" menu items in the File menu).
If changes have been made, the program will remind you to save them before exiting, loading another TestList, etc.
Auto save windows options
When this options is enabled the program will save and restore window parameters (column widths, the size of the panels, etc).
Keep a list of N recent addresses
Instructs HostMonitor to keep a history of recently used addresses.
Store statistics in HML file
This option tells HostMonitor to write all statistical information into a file, so that the statistics build up across multiple
program sessions. If the option is turned off, when an HML file closes down, the statistics pertaining to its tests get reset.
Please note that statistics for any or all of the tests can be nullified at any time using the "Reset ..." menu command.
Store "Recurrences" in HML file
This is an important option, because it is the "Recurrences" field that the program looks at to determine what actions
and when to fire off. Therefore, if the option is deselected, upon closing an HML file or shutting down HostMonitor, the
counter will be reset, so that when the program is restarted, actions will be triggered as tests are first performed.
With the option turned on, recurrence counters will be saved on shutdown, and at the next startup the program will pick up
where it left off, as if the program execution was not interrupted.
Remember current folder
If this option is turned on, HostMonitor will remember current folder and
display it on the next load of the file with tests.
|
|
IP-Monitor |
Options for the IP-Monitor utility: refresh time, chart colors, number of grid lines.
|
|
Message window settings |
HostMonitor can display a popup window when a test changes its status
(as long as you specify the "Show message" option in the alert profile for the test).
On this page of the Options dialog window you can define the parameters for this popup window.
Position
You can choose "Predefined position" option and define the coordinates for the top left corner of the window.
Or choose "Show in the last remembered position" option and HostMonitor will remember the window position on the screen
and will display the popup window in the same location.
Time live
"Close after N sec" - Select this option and specify the amount of time a window will stay
open before automatically closing, unless the [Close] button is selected or
the [Stop] button is used to stop the countdown.
"Close manually" - Window will stay open on screen until the [Close] button is used.
Stay on top" style
Popup window will appear in front of all other windows
|
|
Behavior |
On this page define the following options :
Reset "Recurrences" and refresh test status after editing test properties?
This option will determine the behavior of the program when the user changes the test parameters
(using Test Properties dialog). You can choose one of the 3 options:
Always reset "Recurrences" - after modifying test, program will work as the test was just created, the program will perform test and starts alert actions if needed
Ask confirmation - the program will ask user about action
Don't reset - the program will not reset any counters
Reset "Recurrences" when test gets disabled
With this option enabled HostMonitor will reset "Recurrences" counter for a test every time when this test become disabled.
"Recurrences" field determines what actions and when to fire off. It means that with this option enabled when test
will be disabled and enabled again, actions will be triggered as tests are first performed.
Disable alert reactions
With this option enabled HostMonitor will not start any alert actions, it will perform tests and record logs only.
Consider status of the master test obsolete after N seconds
This parameter is used by the program to determine whether the Master test status is up-to-date.
Before starting a dependent test HostMonitor checks the status values of the Master tests defined on it.
The parameter mandates for how long a Master test status is considered to be current.
Don't start more than [N] tests per second
HostMonitor is multi-threaded so it can test many hosts simultaneously. This parameter defines how many tests per
second the program will start.
|
|
Startup |
On this page you can define different options to determine HostMonitor's behavior at startup.
File load mode
This parameter set HML file (file with list of tests) that HostMonitor should use for monitoring
empty list after load - do not load an HML file
load file [xxx] - load specified file
restore last status - reload last used file
Start/Stop mode
Define if program should starts monitoring upon loading or not. There are 3 options:
start after loading
stop after loading
restore last status
Window status
Choose state of HostMonitor's main window:
minimize after loading - minimize main window after startup.
maximize after loadng - maximize main window after startup.
normal size - display window in it's normal size after startup.
restore last status - restore window's position, size and state that were set at the last closing of the program
Error handler
This parameter defines program's behavior in case error occurs at startup. Choose 1 of 3 options:
Normal start - show error message (if one occurs) and continue after user confirmation.
Ignore errors during starting - don't stop and display message.
Quit if an error occurs - HostMonitor displays message, waits 20 seconds and quits if the user does not press any key to continue.
Place program in Startup menu
Mark this option to add HostMonitor into Startup group. Windows 9x/ME automatically starts programs listed in the
startup group upon loading, Windows NT/2000/XP starts these programs upon user logon.
Also on Windows 2000/XP you can install HostMonitor as a service, please refer to
"How to install HostMonitor as Win32 Interactive service" section for more information.
Also you can specify these parameters using command line. See "Command line parameters" section.
|
|
Service |
HostMonitor uses settings located on this page only when starts as Win32 interactive service
(how to install HostMonitor as a service you can read here).
Log on as
Specify user account (login and password) to impersonate the security context of the user.
When HostMonitor starts as a service, it uses the system account (as all interactive services). But this account
may not have all the necessary permissions, so some tests will not work correctly (UNC test, "disk free space" test
for shared drives, "CPU Usage" test for remote machines, etc). If you need these tests, you will need to assign
a special user account. In this case HostMonitor will impersonate the security context of the user.
Note: Do not change the account using the system utility "Services". If you do so, HostMonitor will not be able to interact with the desktop.
Startup delay
In some cases, initialization of dependent applications and services on the HostMonitor machine may consume a substantial
amount of time. If HostMonitor's tests depend on these applications, false alerts may be generated while they are
initialized.
This setting will cause HostMonitor to wait at least (n) minutes before executing the first monitoring cycle thus
allowing applications and services to start and initialize properly. A setting of "1" (one minute) should be
adequate for most systems.
When service is being stopped
Define HostMonitor's behavior when service is being stopped, choose 1 of 2 options:
save changes in HML file
discard all changes
|
|
Access method |
On this page define the method to access the net to retrieve URLs.
Type of access to retrieve pages:
USE REGISTRY CONFIGURATION
Retrieves the proxy or direct configuration from the registry.
DIRECT TO NET
Resolves all host names locally.
VIA NAMED PROXY
Passes requests to the proxy unless a proxy bypass list is supplied and the name to be resolved bypasses the proxy.
PRECONFIG, PREVENT USING JAVA/SCRIPT/INS
Retrieves the proxy or direct configuration from the registry and prevents the use of a startup JScript or Internet Setup (INS) file.
|
|
Proxy |
Define the following settings if the access method is set to "VIA NAMED PROXY"
Proxy server - address of your proxy server
Proxy port - port number of the proxy server
Use proxy authentication - if your proxy server require authentication you may specify the username and password in these fields.
Proxy bypass list - list of addresses that don't need to be accessed through your proxy server.
This list may include IP addresses, host names, or names of computers from your intranet.
Also, wildcards may be used as well to match domains, host names or addresses.
For example: www.*.com; 128.*; *man*; and so on.
For local addresses use the "<local>" macro.
Use semicolons ";" to separate entries.
|
|
Log settings |
The following is the list of settings to customize the Common Log file.
Common Log file
This parameter defines location and name of the common log file.
Log to specific file
Automatically change the name every month (MMYYYY-Log.ext)
Automatically change the name every day (DDMMYYYY-Log.ext)
Log disabled
If you select the option to automatically change the log file a
date macro variables may
be specified in the log file name. HostMonitor interprets text between the
'%' of the log name as a macro, where 'DD' represents the day of the month,
'MM' - the month, 'YY' - the year (2 last digits), 'YYYY' - the year
(e.g. c:\HostMonitor\Reports\%mm-dd-yy%.html).
Log format
Choose format of the log file:
HTML file
Text file
DBF file
use plug-in - not implemented in this version
Each file format has its own strengths and weaknesses, for more information please refer to "Log & Reports" section of this documentation.
Save mode
Save all information
Save only if host status changes
The "Save all information" option tells HostMonitor to add a record every time a test is performed. If, however,
the opposite option is selected, "Save only if host status changes", no logging happens as consecutive tests return
same status value, until the status changes, at which point a new log record is added. While the second option is
obviously more space-efficient, the first one allows you to build up statistics on helpful test parameters like
response time, reply value, etc. This statistical information can be then parsed and visualized by the
Log Analyzer.
Size limit
If you do not want the log to grow uncontrollably, you can set an upper limit and choose program's behavior when the file reaches its limit:
stop logging when limit is reached
clear log and start over
To get more information about different logging options available in HostMonitor, please, refer to
"Log & Reports" section.
|
|
Advanced Logs |
On this page you can set the settings to customize the ODBC Log and System Log files.
ODBC Log parameters:
ODBC data source
Choose one of ODBC data sources available on your system
Login
Specify user identifier, if necessary
Password
Specify password, if necessary
Timeout
Specify the number of seconds to wait for a login request to complete. If value is 0, the timeout is disabled and
a connection attempt will wait indefinitely.
SQL Query
Specify SQL query to logging test data. Format of the query is entirely up to you, use the macro variables
to put in as much detail as you want. For instance, your log SQL command might look like this:
INSERT INTO HMLOG (DATE1, TIME1, TEST_NAME, STATUS, REPLY) VALUES (%Date%, '%Time%', '%TestName%', '%Status%', '%Reply%')
Of course an appropriate database table has to be created before you start using the ODBC logging.
System Log
HostMonitor uses the system log to record events like start/stop monitoring, as well as information on started and/or
failed alert actions. You can select "Record system messages into common log" to record system information into the same
file used by the common log, or select "Use different log file" option and specify name
of the dedicated system log file.
There are two more options available:
Record info about successful actions
Record info about failed actions
You can select one, both, or non of these options.
To get more information about different logging options available in HostMonitor, please, refer to
"Log & Reports" section.
|
|
HTML Colors |
Customize color scheme for HTML log files. You can use Color Profiles dialog to
select scheme or create new one (use button to the right of the Scheme Name box to bring up Color Profiles dialog).
|
|
Log Viewers |
For each type of log file (HTML, Text, DBF) select one of the options:
Internal - use the build-in viewer
Associate program - use the default Windows viewer for file
External - use an external viewer. Define a command line to start the program that will be used as the viewer.
The name of the log file to view can be passed to this program as a parameter using macro variable %LOG%.
E.g. "notepad.exe %Log%"
|
|
Reports |
HostMonitor can generate HTML, DBF, WLM, and Text reports with the information about tested hosts (e.g. for publishing on
your WEB or WAP site, for sending with E-Mail notification, or for analyzing). On this page you can define a list of up
to 6 global reports (reports that apply to all tests in the working HML file). Just select report profile from drop-down
list and specify name of a target file (you can use a naming pattern to
have HostMonitor switch to a different file every day, month, year, etc.,
as prescribed by the date macro variables
appearing in the pattern).
Also you can bring up Report Manager dialog to configure an
existing report or create a new one.
There are two more parameters that can be specified on this page:
Generate reports every N min
Tells HostMonitor how often reports should be generated
Execute action profile when complete
With this option enabled HostMonitor will launch the specified alert profile after reports were generated (for
example you may use this option to send reports by e-mail). Note: only "scheduled"
actions will be executed, i.e. a condition to start action should be set to "on the schedule" (in
Action Properties dialog).
Use "Generate reports now" button to immediately create reports (for testing purposes).
Note #1: Additionally, each folder may have its own report list; only the tests contained in the folder will be used
to generate these folder-specific reports. For more information about folder, please, refer to "Folders"
section of this documentation.
Note #2: To exclude some tests from reports use test property "Exclude from reports".
Note #3: If you need to create reports every time a test changes its status add the "Generate reports"
action to the Actions Profile. The other way to implement the same behavior would be to add a
"Run HMS Script" action, and include a CreateReport command in the script to execute.
Note #4: Also reports can be generated at user request at any time through the Reports menu in HostMonitor's main window.
|
|
Mailer |
|
On this page define the settings for the build-in mail client.
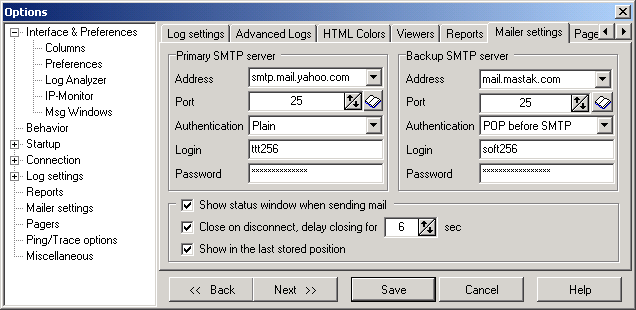
Primary SMTP Server
Address
IP address or hostname of your SMTP server.
Port
TCP port number of the mail server (normally all SMTP servers use port #25).
Authentication method
Select one of authentication methods: None, Plain, Login, Cram-MD5, or POP before SMTP
Login
Specify login (if authentication method is not None)
Password
Define password (if authentication method is not None)
The same parameters you can define for the Backup SMTP server. When HostMonitor tries to send e-mail, at first it uses
Primary SMTP server. If in consequence of some error this is impossible, HostMonitor tries to send e-mail using
Backup SMTP server.
Show status window when sending mail
With this option enabled, HostMonitor will display a window when sending e-mail and show all requests to and answers
from the mail server.
Close on disconnect, delay closing for [N] sec
If you enable this option, HostMonitor will close the window after a specified time interval after disconnection.
Or, press the [Close] button to close the window immediately or the [Stop] button to continue displaying the window
on the screen.
Show in the last stored position
The status window will save its coordinates and restore back to those coordinates when displayed again.
|
|
Pagers |
Use this page to setup general settings for the subsystem which sends messages to pagers and beepers.
Information related to specific pagers may be defined in each action profile.
Device
Specifies your TAPI device (modem) which will be used by the program.
Select a modem from the drop-down list or select the "Auto select free TAPI device item.".
In this case HostMonitor will search through all the compatible devices on
the system and attempt to send the message. If one port is busy, it will
try the next port until it has exhausted all the compatible TAPI ports.
Baud rate
Specifies the baud rate that will be used to communicate with your modem. This can be any of the following: "300", "1200", "2400", "4800", "9600", "19200".
Modem init string
This is the initialization string for your modem. The modem must then respond with an "OK".
You can leave the default value as "AUTO" in this parameter. HostMonitor will search
your Modem's INF file from Windows and prepare a string that will work with most paging carriers.
If the default string does not work, you will need to search the modem's manual and figure a string that will work.
Any time you need to replace the string use the tilde character (~) (i.e. AT&F~). If you need to pause, the hat character (^) will give you a one second pause. (i.e. AT&F~^^AT~).
The maximum length of the modem initialization string is 80 characters.
Specify a termination string by placing a vertical bar (|) after the modem init string.
By specifying AUTO, it will use the strings specified in the modems INF settings. Examples: (AT~|ATZ~) (AUTO|AUTO)
Modem dial string
This is the string the program will send to the modem when it is ready to dial.
The default value is "ATDT". If only a pulse dialtone is available, "ATDP" must be passed to this parameter.
To control how long HostMonitor will wait for a connection before giving up, pass "TO=20" where 20 is the number of seconds desired.
For example, the string to use here is: "TO=20,ATDT".
Show status window when dialing
HostMonitor can display a window when sending messages to a pager, displaying how it sends the message and the results of the operation (also, the program writes the result of sending the message into a log file).
Close window on disconnect, delay before close [NN] sec
After a specified time interval, HostMonitor will close the message window after sending the current message.
Press the [Close] button to close the window immediately or the [Stop] button to keep the window onscreen indefinitely.
If device(s) busy wait up to [xx] min
Specify how long the program will attempt to resend messages.
|
|
Ping/Trace |
On this page specify parameters for the Trace utility and for Ping tests.
Packets to Send
Specify the number of ECHO packets.
Packet Size
Specify the size of ECHO packets.
Timeout
Specify a timeout interval in milliseconds.
Time to Live
Specify a TTL value. TTL (Time To Live) - a technique used in best-effort delivery systems to avoid endlessly looping
packets. For example, each IP datagram is assigned an integer time to live when it is
created. IP gateways decrement the time to live field when they process a datagram and
discard the datagram if the time to live counter reaches zero.
Number of Hops
Specify the maximum number of hops to reach the target.
This is a measure of the distance between two points on the Internet.
A hop count of n means that n gateways separate the source and destination.
Clean old info at start
If selected, Trace utility will clear the output window before perform new test.
Show Host's Description
If option is enabled, the program will display a description of the host beside host name in the Trace utility.
Example:
... www.chat.ru (Russia)
... mainboss.xaxa.BD (Bangladesh)
... www.gazprom.ru (Join-stock company GAZPROM, Moscow, Russia)
Stop tracing when a non-responding device is encountered
By default Trace utility stop tracing when some device does not respond. When you disable this option HostMonitor
will continue trace until reach destination host.
|
|
RCI (Remote Control Interface) |
RCI is a feature of the monitor that allows you to check and control HostMonitor remotely (using web browser or
telnet client). RCI uses TCP/IP protocol and needs just one TCP port. On this page you may setup different
parameters of the interface:
Enable Remote Control Interface
HostMonitor will accept remote control requests and commands only when this option is enabled. This is the main
"switch" of all remote control functions of HostMonitor.
Listen for incoming connections on port
Here you may specify the TCP port number which HostMonitor will use to listen for incoming requests and commands
from Web Service or Telnet Service.
Note that both Web Service and Telnet Service should be configured to use the same TCP port number as the
HostMonitor itself.
Timeout
This is the maximum amount of user inactivity time which HostMonitor will hold an established connection with the
remote user. If the remote user after establishing the connection with HostMonitor does nothing (i.e. does not sends
any control commands) HostMonitor will drop this connection after the specified amount of time expires.
Maximum simultaneous connections
This option specifies the maximum number of simultaneous remote connections that HostMonitor may accept from the
remote users.
It is important to note here that even just one user that connects to HostMonitor via web browser may generate
several simultaneous connections. When an internet browser acquires the document from the internet it may fetch
several parts of the document at once to increase performance. Thus "Maximum simultaneous connections" option of
the HostMonitor's RCI interface should be set to 4 (minimum) if you plan to use web browser to control HostMonitor
(even if just one user at a time will be connected to HostMonitor). Otherwise the web browser may not be able to
display a web page with an interface of the HostMonitor correctly.
User profiles button
This button brings up a User Profiles dialog. There you can specify (for each user account separately) a list of
authorized IP addresses from which a connection to HostMonitor can be accepted and a list of authorized operations
(such as start/stop of monitoring, enable/disable tests, etc) that are allowed for each user. Only "Admin" and
users that already have permissions to modify accounts of other users may access the User Profile dialog.
The following group of check boxes specifies the types of events (associated with Remote Control Interface) that
HostMonitor will or will not add to system log:
Record info about accepted connections
You may enable or disable recording the information about successful connections from the remote users.
Record info about rejected connections
Disable or enable recording the information about rejected (by a HostMonitor) connections from the remote users.
Record info about accepted/executed commands
Disable or enable logging of accepted commands.
Record info about rejected/failed commands
Disable or enable logging of rejected commands.
|
|
Scheduler |
HostMonitors` built in scheduler. Here you may specify which action profiles HostMonitor will execute on schedule.
You have five separate entries in the list. Each of the entries has the following schedule options:
- "None" - no action (alert) will be performed.
- "Regular" - specify the time interval (e.g. every 60 minutes) to perform action profile.
- "Daily" - an action profile will be executed every day at a specified time of the day. Note: the time of the day is specified in 24h format.
- "Weekly" - an action profile will be launched once a week on specified day of the week at a specified time of the day (e.g.: weekly, every Tuesday at 22:00).
- "Monthly" - once a month, on a specified day of the month, at a specified time of that day (e.g.: every 5-th day of the month at 7:00)
- "Quarterly" - an action profile is performed once in a quarter on a specified day of the first month of each quarter at the specified time.
You may set maximum five schedules of a/m types. In each schedule you may select an action profile that will be
executed accordingly. Use the drop down list to select action profiles. By clicking the button next to a drop down
list you will access the Action Profiles dialog window where you may add new
action profiles and actions or edit the properties of existing actions.
Note: only "scheduled" actions will be executed by Scheduler, i.e.
a condition to start action should be set to "on the schedule" (in Action Properties dialog).
|
|
Miscellaneous |
Use fixed date & time formats
By default HostMonitor gets current Windows regional settings at startup and uses these parameters until you change
Windows settings and restart monitor. You can mark this option and define date & time formats. In this case,
HostMonitor will use the specified formats, regardless of the system settings.
URL test related options
Do not check Internet connection
Normally HostMonitor checks if computer connected to Internet before "URL request" test (to avoid appearance Dial-Up dialog).
With this option enabled HostMonitor will not perform this check.
Agent name
Some server-based scripts can check agent name and returns different information for different HTTP agents
(e.g. generate different HTML pages for IE or Netscape). You can change this parameter to get correct results.
Accept SSL/PCT certificates with invalid host name
Disables function checking of SSL/PCT-based certificates that are returned from the server against the host name given in the request.
Accept SSL/PCT certificates with invalid dates
Disables function checking of SSL/PCT-based certificates for proper validity dates.
UNC test related options
UNC test mode
This parameter defines behavior of UNC tests. Select 1 of 3 options:
Normal - HostMonitor can start many tests simultaneously.
OnePerServer - HostMonitor will start only 1 test per server at one time, but can start several tests for different servers at the same time.
OneByOne - only 1 attempt at one time (one attempt means - if "UNC test retries" value greater than 1,
HostMonitor tries to get information from 1st server; if this try failed, HostMonitor will pause test for this
server and will try to check another servers, after 900ms HostMonitor returns to 1st server and performs 2nd attempt).
UNC test retries
Define how many times HostMonitor will try to get information from server (in one test)
Show errors description in "Reply" field when cannot access resource
If you check this option, HostMonitor will put error description in "Reply" field in case "UNC" test cannot access to resource.
NT Event Log test related option
Show events description in "Reply" field for "check NT Event Log" test
HostMonitor can show events description in field "Reply".
You can use %Reply% macro in e-mail body, in message for pager, etc.
Also this description will appear in reports, log file.
SNMP test related option
Automatically append the single instance sub-identifier (".0").
Since the "SNMP test" is typically applied to single instance MIB objects that HostMonitor
automatically appends the single instance sub-identifier (".0").
Though this has an unfortunate side effect for table instance retrieval, to retrieve correct values for the table
instances disable this option.
ODBC related options (following options
have effect for ODBC tests, ODBC logging, and "SQL Query" action)
Do not use SQLFetchAbsolute command
Not every ODBC driver supports SQL_FETCH_ABSOLUTE command. HostMonitor
tries to use this command and if driver returns error, HostMonitor use
cycle with SQL_FETCH_NEXT command.
It works fine with most ODBC drivers. However ODBC driver which comes
with Oracle client v.8 (and may be some other drivers) has bug in error
handler. This bug can cause ODBC driver to crash.
That's why this option was implemented. Use it if you experience problem
with ODBC driver.
User DSN/System DSN
As you know Windows has system data source names (System DSN) and user
data source names (User DSN). System data sources are local to a computer
but not user-dedicated; any user with privileges can access a system DSN.
User data sources are local to a user and accessible only by the specified
user. Using "User DSN/System DSN" option you can choose which data sources
list will be used by HostMonitor.
Please note if you start HostMonitor as service, it will not be
able to use user DSN. System DSN will be used settings' independently.
So, if you are planning to start HostMonitor as service and as regular
application, use "System DSN" option. In this case HostMonitor will
work equally in both modes.
|
|
Command line parameters |
You can start HostMonitor using command line parameters (these parameters have priority before settings defined in the Options dialog) such as:
| /Ini=IniFileName | - | Read options from specified ini file, by default from "hostmon.ini". |
| /List=HostsFileName | - | After startup load specified TestList file (HML file with tests). |
| /ErrorHandler=Default | - | Normal startup (show error message (if one occurs) and continue). |
| /ErrorHandler=Ignore | - | Ignore all errors during startup (do not stop and display message). |
| /ErrorHandler=Quit | - | Quit if error (HostMonitor will display the message, wait 20 seconds and quit if operator does not press a key on the keyboard). |
| /start | - | Start monitoring after loading. |
| /stop | - | Do not start monitoring after loading. |
| /minimized | - | Minimize main window after startup. |
| /maximized | - | Maximize main window after startup. |
| /normal | - | Display window in it normal size after startup. |
| |
| /InstallService | - | Install HostMonitor as Win32 interactive service. |
| /UninstallService | - | Uninstall service |
If you install HostMonitor as a service, the program will be started by the service control manager automatically during
system startup. For more information see "How to install HostMonitor as Win32 Interactive service"
section.
|
